Fitting wardrobes around chimney-breast alcoves in Bradford terraces
How fitted alcove wardrobes work in Bradford Victorian terraces. Why off-the-shelf does not fit. How we scribe to the original walls.
Bradford has a lot of Victorian and Edwardian terraces. Whole districts of the city — Frizinghall, Manningham, Heaton, Bowling, Bolton — are stacked with stone-built houses that were thrown up between 1860 and 1910 when Bradford was the wool capital of the world. Almost every one of them has the same problem in the principal bedroom: a chimney breast running up the wall, with deep alcoves either side.
The chimney breasts are usually 30-60cm deep. The alcoves are 60-90cm deep and 90-110cm wide. Those dimensions are the reason you cannot buy a freestanding wardrobe that fits properly. They are also the reason fitted alcove wardrobes were invented.
This post is what we have learnt fitting hundreds of them over twenty-five years. If you have a Bradford terrace bedroom with a chimney breast in it, this is the work we know best.
Why the off-the-shelf options fail
There are three things people try before settling on a properly fitted alcove wardrobe.
A freestanding wardrobe pushed into the alcove. This is the most common first attempt. The wardrobe is 60cm deep (standard) and the alcove is 70cm deep (typical Bradford terrace). The wardrobe sits 10cm proud of the chimney breast, the doors clear the chimney breast by 5cm, and there is a 10cm gap behind the wardrobe filling with dust. It works in the sense that you can hang clothes in it. It does not look right. Visually the wardrobe is a separate object floating in the room rather than part of the architecture.
An off-the-shelf alcove “kit” wardrobe. A few national suppliers do flat-pack alcove wardrobes sized for “typical” alcoves. The problem: Bradford terraces were not built to typical dimensions. The original masons did not run a tape measure across the wall before they started. We have measured alcoves where the back wall is 4cm out of true over a metre, the side wall slopes inward by 2cm, and the cornice line drops 1.5cm across the alcove width. A square kit wardrobe shipped from a national factory cannot accommodate any of that. You either pack it out with filler strips (which looks worse than the freestanding option) or you cut the kit on site and ruin the finish.
Calling Sharps or Hammonds. Both will quote a fitted alcove wardrobe. The cabinetry will be good. The fit will depend entirely on the subcontracted fitter on the day, and the price will be £3,000-£4,000 for an alcove pair we would quote at £1,995-£2,500. They are not wrong to do the job — they just do not do it as well, at the price, as a local specialist can.
The properly fitted alcove wardrobe — designed to your specific alcove, built in a workshop with your measurements, fitted with end panels scribed to the original walls — is the answer. The rest of this post is how that works.
How we measure the alcove
The design visit is roughly an hour. The first thirty minutes are measuring. We use a laser distance measurer and a steel rule for the close work, plus a small spirit level and an angle finder.
We take, for each alcove:
- Width at the back wall, at the front edge, and at three heights (floor, mid, ceiling). Bradford alcoves are almost never perfectly rectangular. The widest point is usually at the front; the back is sometimes 1-2cm narrower because the chimney breast bulges slightly toward the rear.
- Depth at the bottom, middle, and top. The cornice often projects further than the skirting; the depth is rarely consistent top to bottom.
- Height to the ceiling, plus the position and projection of any picture rail, cornice, or skirting on both the alcove walls and the chimney breast.
- Floor levels. Most Bradford terrace floors slope. We level the cabinetry to the architectural reality rather than fighting it.
- Plumb and square readings on every face. If a wall is out of plumb by 2cm over the wardrobe height, the end panel needs to taper to match. If it is square, the panel can be a straight cut.
Those measurements are written into the sketchbook alongside the elevation drawing. The cabinet dimensions are derived from them in the workshop the next day.
Hinged or sliding for alcoves?
Both work. The decision depends on the alcove dimensions and the room.
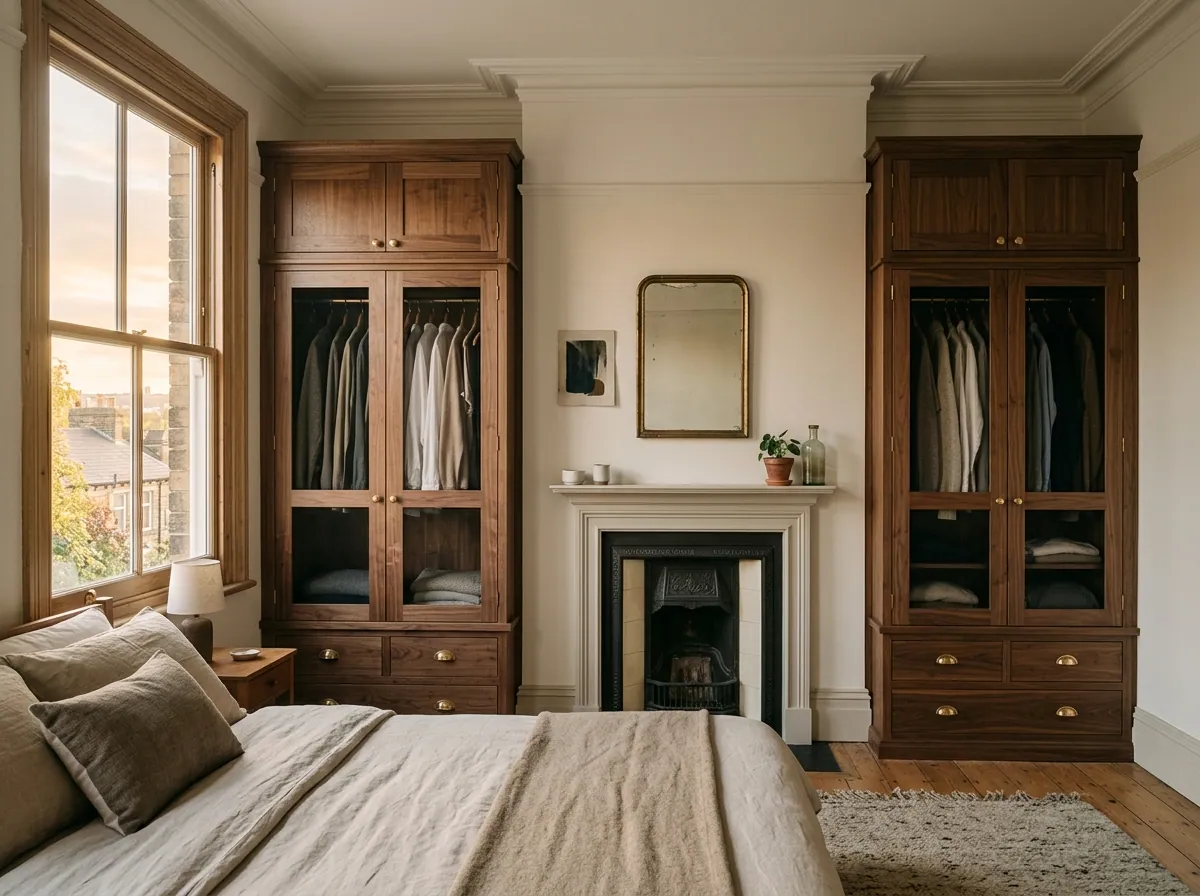
Hinged is the right call when the alcove is roughly 1m wide and the room has the swing space. Two doors per alcove, brushed brass cup handles, full open access to every shelf and drawer when the doors are open. Visually the wardrobes read as part of the architecture — particularly with painted shaker fronts and brass handles.
Sliding is the right call when the alcove is wider than 1.4m (giving you a meaningful three-panel slide) or when the room is too narrow for door swing. Sliding gives you full-height storage with no swing penalty.
For most Bradford terraces, hinged is the better choice in the principal bedroom. The alcove width is typically 90-110cm — enough for a meaningful two-door hinged unit. Sliding works better in the larger Frizinghall and Manningham four-storey terraces where the alcoves can be 1.4m+ wide.
End panels and the period detail
The end panel is the visible vertical face on the room-side edge of each alcove wardrobe. It is the surface that meets the open room, and it is where the period detail matters most.
We scribe end panels to:
- The picture rail. The end panel notches around the picture rail at exactly the right height and depth, so the rail appears to run straight through. If the picture rail is at 2.4m and projects 3cm from the wall, the notch is a 3cm-deep cut at 2.4m height. The line continues unbroken.
- The cornice or coving. Same principle. Ornate cornice is harder to scribe than plain — we sometimes take a profile rubbing on site and the workshop carves the matching end-panel profile by hand.
- The skirting. The end panel notches around the original skirting at the floor. We do not remove the skirting (it is part of the room’s character); we let it run through.
- The chimney-breast face. Where the end panel meets the chimney breast, we scribe it close enough that a 1mm gap is the worst case. Most projects achieve flush contact along the whole vertical.
The scribing happens at two stages. The big notches (picture rail, cornice) are pre-cut at the workshop using the site measurements. The fine work (final fit to slightly-irregular walls) happens on site with a handsaw and a coping saw.
Always floor to ceiling
For alcove wardrobes specifically, we recommend floor to ceiling almost always. Three reasons:
- Storage. The metre of space between a 2m wardrobe top and a 3m ceiling is usable space. Luggage, off-season clothes, hat boxes, the things you only need twice a year.
- Architecture. A floor-to-ceiling wardrobe reads as part of the room. A wardrobe with a dust shelf at the top reads as a wardrobe that someone added.
- Cleaning. The top of a 2m wardrobe collects dust at a rate that is genuinely depressing. Floor-to-ceiling solves it.
The only time we stop short of the ceiling is when the cornice is so ornate that scribing it would be a disservice to the original work. In those cases we leave a 2-3cm shadow gap at the cornice and let the wardrobe sit just below.
What we do not touch
The chimney breast itself. It stays as it is. If you want to mount a TV on it or fit a stone surround, that is a separate trade; we are happy to work alongside, but we do not do that work ourselves.
We also do not remove or shorten the chimney breast. We have been asked. The structural risk is not worth it, and the loss of storage from rebuilding the alcove afterwards is rarely worth the gain.
Where this works in Bradford
We fit alcove wardrobes constantly across:
- Frizinghall (BD9) — the four-storey end-of-terraces with deep alcoves and high ceilings.
- Manningham (BD8) — once “one of England’s greatest Victorian suburbs”. Substantial terraces, ornate cornice.
- Heaton (BD9) — Victorian and Edwardian terraces, principal bedrooms big enough for two-door alcove units.
- Saltaire (BD18) — stone workers’ terraces, original sash windows, smaller-scale alcoves.
- Bowling and Bolton (BD3, BD4) — inner-Bradford Victorian belt, shallower alcoves but the same brief.
- Eccleshill, Idle (BD2, BD10) — tighter Victorian housing on the north-east side.
If your house is in one of these areas and you have a chimney-breast bedroom, the chances are we have already done a project on your street or one nearby. Bring it up at the design visit — we are happy to share what we learned.
The first step, as always, is a free design visit at your kitchen table. We come to your home, measure properly, and give you a fixed price before we leave. No obligation, no follow-up sell, no negotiation.
Free, in your home, no obligation.
The honest next step is a free design visit at your kitchen table. We come to you with samples and a tape measure, give you a fixed price before we leave.
Book a design visitTell us where the wardrobe needs to go.
Three fields. We will call you back within the working day to book your design visit. We never share your details. No spam, ever.
Or call us on 01274 051295.